Monday - Friday | 9 AM - 5 PM
Mon - Fri | 9 AM - 5 PM
(256) 633-6553
Shop DIY Mini Splits and take control of your home’s heating and cooling with ease. These energy-efficient units are designed for simple installation, so you can skip the professional help.
Here are the three best DIY Mini Splits on The Trade Table:
The MRCOOL E Star DIY 4th Gen 36k BTU Ductless Mini-Split Heat Pump is a versatile, high-performance system designed for easy DIY installation, providing efficient heating and cooling for spaces up to 1,500 square feet. This system includes both an indoor and outdoor unit, featuring a variable-speed compressor that adapts to temperature and humidity levels to maximize comfort and energy savings. With a sleek design, smart features like Wi-Fi compatibility, and environmentally friendly R-410A refrigerant, it allows users to control settings through a mobile app for convenient temperature management. Additionally, its durable build ensures quiet operation, and the system is backed by a 7-year compressor and 5-year parts warranty, making it ideal for both residential and commercial applications.

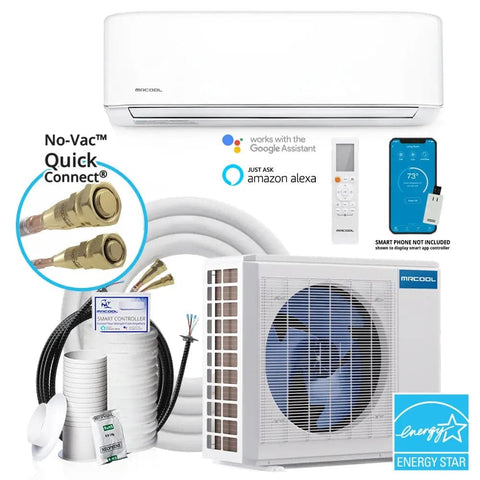
The MRCOOL DIY 4th Generation E Star 24k BTU Ductless Mini-Split Heat Pump Complete System is a highly efficient and user-friendly HVAC solution designed for spaces up to 1,000 square feet. It offers a SEER rating of 20.5, making it Energy Star certified, and is equipped with a variable-speed DC inverter compressor that adjusts to maintain optimal indoor temperatures while minimizing energy consumption. This DIY system comes with MRCOOL's patented pre-charged Quick-Connect Line Set, allowing homeowners to install it without needing professional help. The system supports multiple modes including cooling, heating, fan-only, and dehumidification, and can be controlled via a remote or through the Smart HVAC app, making it convenient to adjust settings on the go. With its corrosion-resistant Gold Fin condenser, the unit is ideal for both coastal and inland applications, and it is backed by a limited lifetime compressor warranty for added peace of mind.
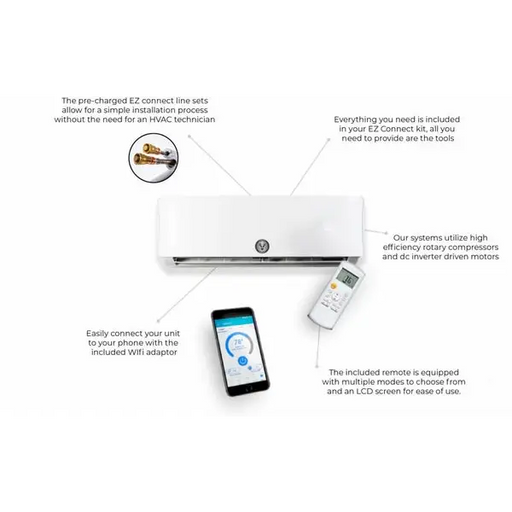
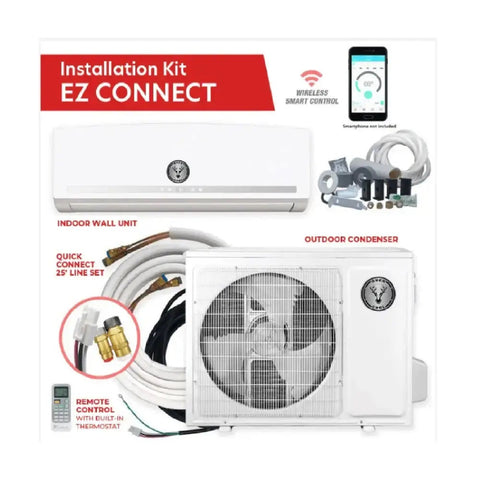
The Buck Cool Mini-Split EZ Connect 12K BTU Complete Installation Kit offers a straightforward solution for heating and cooling small spaces up to 500 square feet. With its pre-charged line sets, DIY installation becomes accessible without needing an HVAC professional, saving both time and money. The unit features a 12,000 BTU cooling/heating capacity, a high SEER rating of 22 for energy efficiency, and a quiet operation at 38 dBA. Equipped with WiFi connectivity, it allows control via smartphone, making it perfect for modern smart home setups. This system also includes a remote control with a built-in thermostat, ensuring convenient adjustments for your comfort. Additionally, the kit provides everything necessary for installation except tools, making it a hassle-free choice for homeowners looking to manage their indoor climate.
Here are some frequently asked questions about DIY Mini Split:
A DIY Mini Split is a ductless heating and cooling system that allows homeowners to install it themselves without professional help. These systems come with pre-charged refrigerant lines and easy-to-follow instructions, making them accessible for individuals with basic tools and skills. DIY Mini Splits are energy-efficient, compact, and versatile, ideal for homes without traditional ductwork.
To install a MRCOOL DIY Mini Split, start by mounting the indoor unit on an exterior wall and drilling a hole for the refrigerant lines. Connect the pre-charged lines to the outdoor unit, then follow the manufacturer's instructions to set up the electrical wiring. Make sure all connections are secure, and perform necessary checks before powering on the system for the first time.
The most efficient DIY Mini Split systems typically have high SEER (Seasonal Energy Efficiency Ratio) ratings. MRCOOL DIY and Pioneer WYS Series are some of the top-rated models, with SEER ratings of 20 and above. These systems are designed to provide optimal heating and cooling performance while using less energy.
MRCOOL DIY Mini Split systems can be purchased from The Trade Table.
To install a DIY Mini Split, mount the indoor and outdoor units in their desired locations. Run the pre-charged refrigerant lines, power cables, and drain tubes between the units. Finally, connect the system to a dedicated electrical circuit and follow all start-up procedures before turning it on.
Wiring a MRCOOL DIY Mini Split involves connecting the indoor and outdoor units to a dedicated power source. You’ll need to run a wire from your electrical panel to the outdoor unit and then connect the indoor unit to the outdoor unit using the pre-installed wiring. Always follow the manufacturer’s instructions for safety and ensure your power supply is compatible with the unit's requirements.
Recharging a MRCOOL DIY Mini Split isn't typically necessary, as the system comes pre-charged with refrigerant. However, if you ever need to recharge it, it's recommended to contact a professional, as handling refrigerants requires certification and proper tools. The system should only need recharging if there’s a leak or significant loss of refrigerant over time.
Yes, you can install a DIY Mini Split system yourself if you follow the instructions carefully. These systems are designed for easy installation with pre-charged lines, so you won’t need specialized tools. However, if you're uncomfortable with electrical work, it's best to get professional help.
A DIY Mini Split system typically costs between $500 to $3,000, depending on the size and number of zones. Since it's a DIY project, you save on labor costs, but factors like your location and system complexity affect the total price. Multi-zone systems and larger spaces tend to increase costs.
DIY Mini Split systems need regular filter cleaning every 1-2 months to maintain efficiency. You should also check for debris around the outdoor unit and ensure all connections remain secure. Seasonal maintenance before peak usage is recommended to prevent breakdowns.
For someone handy, installing a DIY Mini Split can take around 4-6 hours. If you lack experience or help, the project might take up to a weekend. There’s no rush, so working at your own pace is recommended.
The main difference is that DIY Mini Splits come with pre-charged lines, so you don’t need a professional to vacuum and charge the refrigerant. Regular mini splits require specialized tools and professional installation. DIY systems are designed for easier setup by homeowners.
Yes, most DIY Mini Split systems come with pre-charged lines, so you won’t need to handle refrigerants yourself. This makes installation simpler and safer for non-professionals. Just ensure you follow the instructions to avoid any leaks.
Yes, DIY Mini Split systems can provide both heating and cooling, making them suitable for year-round comfort. Most of these systems are heat pumps, which means they can efficiently extract heat from the air even in cold temperatures. This dual functionality makes them versatile for any climate.
Many modern DIY Mini Split systems offer compatibility with smart home devices. They often feature built-in Wi-Fi or can be paired with smart thermostats, allowing remote control via apps. This feature helps optimize energy use and adds convenience.
DIY Mini Splits are highly efficient, with most models featuring high SEER ratings. Their ductless design reduces energy loss, making them more efficient than traditional systems. This can lead to significant savings on your energy bill.
To install a DIY Mini Split, you’ll need basic tools like a drill, a hole saw, screwdrivers, and wrenches. Since the system is pre-charged, no special HVAC tools are required. Just ensure you have everything ready before starting the project.
Common mistakes include incorrect placement of the units, improper sealing of the connections, and not following the manufacturer’s instructions. Ensure you pick the right spot for both the indoor and outdoor units and double-check all connections. Taking your time will help avoid costly errors.
Yes, many DIY Mini Split systems come in multi-zone options, allowing you to expand to additional rooms. However, you’ll need to choose the right model for your setup. Check the system's capacity to ensure it can handle the number of zones you need.
With proper maintenance, DIY Mini Split systems can last 10-15 years or even longer. Regular cleaning of filters and seasonal checks on the system will help extend its lifespan. Be sure to follow the manufacturer’s guidelines for optimal longevity.
It depends on the manufacturer’s warranty terms. Some brands specifically design their systems for DIY installation and offer full warranties even without professional installation. Always read the warranty terms carefully before starting your project to avoid voiding coverage.
No, DIY Mini Split systems are generally very quiet, with indoor units operating at low decibel levels. They’re quieter than traditional HVAC systems, making them a great option for bedrooms or home offices. Outdoor units are also designed to minimize noise.
You can buy a DIY Mini Split at The Trade Table.
When deciding between a DIY Mini Split system and a Non-DIY option, it's important to understand the key differences in installation, costs, and features. Both provide efficient heating and cooling solutions, but your choice depends on your comfort level with installation and budget.
A DIY Mini Split is designed for homeowners to install themselves without needing a professional. These systems come with pre-charged refrigerant lines, making installation straightforward for those with basic tools and skills.
A Non-DIY Mini Split requires professional installation and is typically more customizable. These systems are suitable for larger or more complex setups and ensure proper performance and warranty protection.
Choosing between the MRCOOL DIY Mini Split and the Buck Cool EZ Connect Mini Split comes down to ease of installation, efficiency, and smart features. Both systems are designed for homeowners seeking an affordable, DIY heating and cooling solution without the need for a professional technician.
MRCOOL DIY Mini Splits are widely known for their ease of installation and advanced features. These units are perfect for homeowners who want control over their indoor climate without the hassle of hiring a professional.
The Buck Cool EZ Connect Mini Split offers similar DIY benefits but is designed for those looking for a more budget-friendly option while still maintaining high performance. The system also includes smart home capabilities to fit modern lifestyles.
MRCOOL 24k DIY 5th Generation Mini-Split Air Handler and Condenser 230V - R454B Refrigerant Easily upgrade your space with the MRCOOL DIY 5th Gen...
View full detailsMRCOOL DIY 5th Generation 12,000 BTU Ductless Heat Pump Mini Split Complete System 115V - R454B Refrigerant Bring efficient, all-in-one heating a...
View full detailsMRCOOL DIY 5th Generation 9,000 BTU Ductless Heat Pump Mini Split Complete System 115V - R454B Refrigerant Bring efficient year-round comfort to yo...
View full detailsMRCOOL DIY 5th Generation EasyPro 24,000 BTU 18.9 SEER Heat Pump Mini-Split Complete System 230V - R454B Refrigerant Enjoy reliable, ...
View full detailsBuck Cool Mini-Split EZ Connect 12K BTU Complete Installation Kit The Buck Cool Mini-Split EZ Connect Complete Kits are designed to offer a simple ...
View full detailsMRCOOL DIY 5th Generation EasyPro 18,000 BTU 20 SEER Heat Pump Mini-Split Complete System 230V - R454B Refrigerant The MRCOOL® Easy P...
View full detailsMRCOOL DIY 5th Generation EasyPro 12,000 BTU 19.5 SEER2 Heat Pump Mini-Split Complete System 115V - R454B Refrigerant The 5th Generat...
View full detailsMRCOOL DIY 5th Generation EasyPro 9,000 BTU 20.2 SEER Heat Pump Mini-Split Complete System 115V - R454B Refrigerant The 5th Generation MRCOO...
View full detailsMRCOOL Energy Star DIY 4th Generation 24,000 BTU 20.5 SEER Wall Mounted Air Handler 230V with 25 ft. DIYPro Cable and Enhanced WiFi - R410A Refrig...
View full detailsMRCOOL Energy Star DIY 4th Generation 18,000 BTU 22 SEER Wall Mounted Air Handler 230V with 25 ft. DIYPro Cable and Enhanced WiFi - R410A Refriger...
View full detailsMRCOOL Energy Star DIY 4th Generation Multi-Zone 12,000 BTU 22 SEER Wall Mounted Air Handler 230V with 25 ft. DIYPro Cable and Enhanced WiFi - R41...
View full detailsMRCOOL Energy Star DIY 4th Generation 12,000 BTU 22 SEER Wall Mounted Air Handler 115V with 25 ft. DIYPro Cable and Enhanced WiFi - R410A Refriger...
View full detailsMRCOOL Energy Star DIY 4th Generation Multi-Zone 9,000 BTU 22 SEER Wall Mounted Air Handler 230V with 25 ft. DIYPro Cable and Enhanced WiFi - R410...
View full details
Absolutely Love It!
John at the trade Table made this purchase possible....He helped me navigate every step of the way
I am SO pleased with it!
Anastasia Snyder

Exceptional Customer Service
We ordered the Autograph Edition Kitchen Package and could not be happier with the aesthetics! The entire team at The Trade Table from ordering, shipping, and minor issues after installation - have thus far exceeded our expectations. We look forward to many years of use of our appliances. :)
Julie Dunlap

The stove is working beautifully!
The stove is working beautifully! Up here in the San Juan Mountains, we're starting to experience some chilly mornings. Today, it was below 30 degrees at 7 am! I'm grateful for having this Heater, especially since the days warm up to nearly 80 degrees, making it pretty spectacular.
Cheryl

Grateful for Exceptional Service!
I have nothing but good things to say about my experiences. We had an accident at home causing the filter to break (my own end- nothing to do with quality) and customer service went above and beyond to get me a replacement. It is rare to find in this day and age such personalized assistance.
Kelly Tumberg

Perfect
The lift is perfect. Thank you
Anonymous

Outstanding Service and Perfect Delivery
Customer service was exception with email updates on the status of my shipment and a phone call even. My product arrived in perfect order.
Jaron Holder
Highly Recommended!
John was fantastic to work with. I am so glad to have found him! He took care of every detail promptly!
Margaret Russell
Excellent Service and Support
Very knowledgeable, and very helpful. John, researched what filters I needed for my particular Greenfield water filter system. And received those filters, and were the exact ones I needed. Again I would like to thank John for his professionalism and down home attitude.
Joel Allen