You've got a piece of land that needs some grading work, but you want to hire something other than an expensive contractor with a bulldozer. By purchasing a skid steer and the right heavy equipment attachments, your trusty skid steer can take care of all kinds of grading jobs and save you a ton of money in the process. Here at The Trade Table, we'll walk through everything you need to know to take on basic grading projects with your skid steer like a total pro.
TM Manufacturing Spade Blade Skid Steer Attachment

$1,795.00
TM Manufacturing Spade Blade Skid Steer Attachment Transform your skid loader into a high performance digging machine with the TM Spade Blade. This skid steer attachment can be used to excavate rocks, stumps, and trees with ease. The spade blade… read more
Prepping the Site Before Skid Steer Grading
Before you start moving dirt around with your skid steer, you'll need to prepare the site. First, walk the area and remove any large rocks, debris, or other obstacles that could damage your machine or interfere with grading.
Next, use stakes and string to mark the perimeter of the area you want to grade and the final slope you're trying to achieve. This will give you a visual guide to work towards as you're grading. You'll also want to mark any areas that need extra attention, like low spots that require fill or high spots that need cutting.
Use extra caution if any existing structures like buildings, trees, or retaining walls are nearby. You'll want to work slowly around these areas to avoid damage. It may also help to install temporary fencing or barriers to protect them.
TM Manufacturing Pro 2 Log Splitter Skid Steer Attachment | 24”, 30” or 36” Stroke

$5,395.00
TM Manufacturing Pro 2 Log Splitter Skid Steer Attachment | 24”, 30” or 36” Stroke The TM Pro 2 Splitter (Patent # 9662801) revolutionizes splitting wood. This splitter ranges in stroke length from 24-36” with 4.5-5” cylinders, with a viewing window… read more
Erosion Control and Permitting for Skid Steer Grading
You should also consider installing silt fencing or other erosion controls before getting started, especially if you're grading near waterways or drainage areas. Silt fencing helps prevent excess soil from washing away during rain or irrigation.
Finally, make sure you understand the local regulations regarding grading and permitting in your area. For larger jobs, you may need special permits or inspections to ensure proper drainage and stabilization. It's best to check with your local planning department to avoid potential fines or rework.
Loflin Fabrication Skid Steer Pallet Fork Frame

$502.00
Loflin Fabrication Skid Steer Pallet Fork Frame Effortlessly handle palletized materials with the Loflin Fabrication Standard Skid Steer Pallet Forks Frame. This American-made attachment, designed for skid steer loaders, empowers construction crews, warehouse workers, and property owners to manage pallet handling tasks with unmatched efficiency… read more
Grading Materials and Attachments You'll Need
To grade efficiently with your skid steer, you’ll need the proper attachments and materials. The right tools will allow you to shape the land exactly how you envision it.
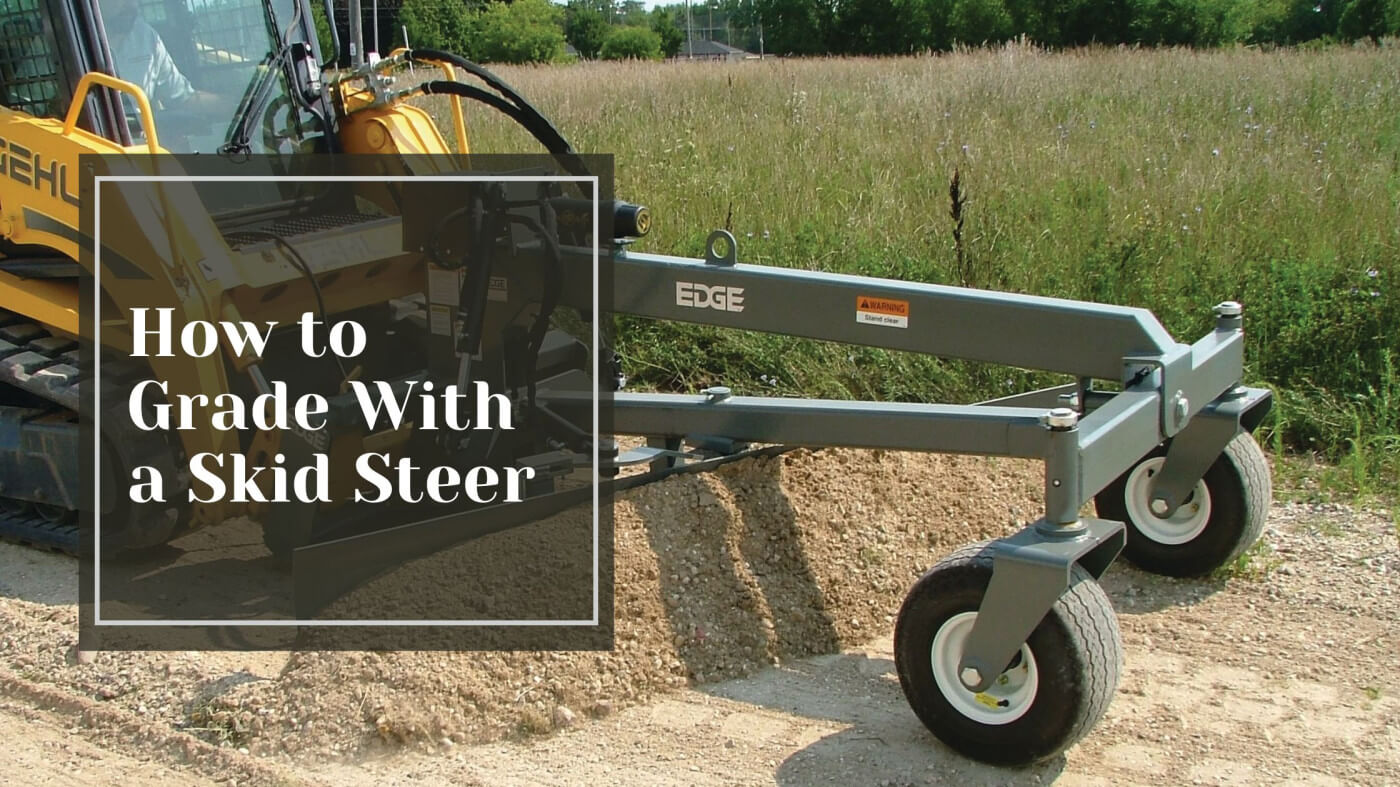
Skid Steer Grading Blade
The most important attachment is a grading blade, also known as a box blade. This blade attaches to the front of your skid steer and is used to push dirt and level the ground. Look for a blade at least 6 to 8 feet wide for mid-size grading projects. The blade should also have adjustable scarifier teeth that can dig into the soil.
Buckets
In addition to a blade, a bucket is useful for scooping and moving dirt, gravel, or debris. A general-purpose bucket, like a light material bucket or utility bucket, will work for most grading applications. For moving heavier materials, consider a heavy-duty bucket. You'll want at least a 66 to 80-inch bucket for efficient grading work.
Ripper Attachment
For breaking up compacted soil or ripping out vegetation, a ripper attachment is helpful. This attachment has several shanks that dig deep into the ground. As the skid steer moves forward, the ripper tears up the surface. It's useful for preparing soil before grading.
Compactor
Once you've graded the area, use a compactor attachment to pack down the soil. This helps create an even, solid surface. Compactors come in vibratory and static roller types. Either will work, but a vibratory compactor typically provides better compaction.
Loflin Fabrication Mini Skid Steer Auger

$3,566.00
Loflin Fabrication Mini Skid Steer Auger The Loflin Fabrication Mini Skid Steer Auger is built for durability with a powder-coated finish and features an Auburn planetary drive. It includes Parker brand hoses, fittings, and couplers, ensuring it is ready for… read more
Step-by-Step Guide to Grading With a Skid Steer
Now that you understand the basics, it’s time to hop in your skid steer and get to work. Grading with a skid steer takes some practice, but follow these steps and you’ll be leveling land in no time.
Plan Your Route
Map out how you want to approach the grading job. Work systematically across the area, section by section. Start at the top of the slope and work your way down. Push the dirt from the high spots into the low spots. Make multiple passes over the entire area until you achieve your desired slope.
Engage the Blade
Lower the skid steer blade to just above the ground. Tilt the blade to the desired angle of your slope. Begin driving forward slowly while watching the blade. Use the controls to raise and lower each end of the blade, adjusting as needed.
Make Multiple Passes
Rarely will you achieve an even slope in a single pass. Continue driving over the area, raising and lowering the blade to push more dirt from the high spots into the low spots. Check your progress with a level or transit level. Make as many passes as needed, adjusting the blade angle and height to refine the slope.
Smooth and Compact
Once you have the general slope established, make final passes over the area with the blade raised slightly to smooth the surface. Then use the skid steer tires or attachment, like a roller, to compact the soil. This helps prevent erosion and provides a solid surface.
Check Your Work
Hop out of the skid steer and survey the area to ensure an even slope. Make spot checks with your level. Look for any remaining high or low spots that need touching up. Make final passes until you're satisfied with the grade. Then you can move on to the next section.
Loflin Fabrication Mini Skid Steer Brush Cutter

$4,230.00
Loflin Fabrication Mini Skid Steer Brush Cutter Powder coated finish for durability Proprietary drive 1 piece heat treated forged steel axle The housing is a 1 piece iron casting 2 oversized tapered roller bearings Roller bearings are grease packed for… read more
Skid Steer Grading Tips and Tricks for a Professional Finish
To get pro-level results, focus on technique and efficiency.
Go slowly.
Rushing through a grading job often leads to mistakes and an uneven finish. Take your time and be meticulous. Check your work frequently by walking around the site
Overlap your passes. Never assume one pass with the blade will do the trick. Overlap each pass by about 1/3 to blend the new grade with the surrounding area
Make minor adjustments.
Use the tilt, lift, and angle controls on your skid steer to tweak the blade height and angle. Frequently check that water is draining properly from the site. Even small changes can make a big difference in the final grade.
Change directions.
Don’t grade in the same direction with each pass. Change up the pattern to ensure an even surface. Going at different angles also allows you to see the site from multiple perspectives so you can spot any problem areas
Leave the blade down.
When repositioning the skid steer, don’t raise the blade. Leave it slightly engaged with the ground as you drive to the new location. This helps create a smoother transition between sections.
Check your work.
Do a final walk-around of the entire site once you’ve finished grading. Look for any spots that need touch-ups, check that the grade is even and uniform, and ensure proper drainage and compaction. It’s much easier to fix any issues now rather than after you’ve demobilized the equipment.
Loflin Fabrication Vertical Grapple

$4,560.00
Loflin Fabrication Vertical Grapple Works like a rake, allows dirt to fall through Has 2″ X 10″ hydraulic cylinders Independent grapple tines 11⁄2” thick steel tines Reinforced quick attach Fully protected hoses Covered hydraulic cylinders Fully greasable hinge points Oversized,… read more
How to Grade With a Skid Steer
So there you have it - the basics on how to grade with a skid steer like a pro. By following these tips on evaluating the site, selecting the right attachments, making multiple passes, and maintaining proper control, you'll be smoothing and shaping the terrain like an expert operator in no time. Just take it slow, pay attention to safety, and focus on getting the job done efficiently. With the right skid steer setup and smart operating techniques, you can achieve a clean, professional grade for your project.